Welcome to part three of our Facebook advertising series. Today, we’ll be setting up your Facebook Ads Manager account!
Creating Your Facebook Ads Manager Account
In the first part of our Guide to Facebook Advertising series, we discussed why you should explore Facebook ads for your social media marketing needs. Let’s continue our journey by learning how to set up your Ads Manager account.
Ads Manager is your starting point for running advertisements across Meta technologies, including Facebook and Instagram. The Meta Ads Manager tool is necessary to create, manage, and track your Facebook ads. It offers a user-friendly interface and can be used by advertisers of all experience levels, which means anyone can take advantage of the benefits of social media marketing.
To create your Ads Manager account, you will need to log in to your Facebook Business Page or Instagram business account.
Pro tip: You’ll need to identify your currency, time zone, spend limit, and form of payment when setting up your account.
- On your Facebook home page, in the column on the left side, expand the menu by clicking “See More.” Click Ads Manager.
- If you prefer to use your mobile device, download the Ads Manager app.
- You will automatically be assigned an account ID number. Your time zone and currency will be assigned based on your location. If you need to change those, a new Ads Manager account will be set up for you.
- Click the credit card icon on the left to enter your payment method (this can be changed at any time) and set up your account spending limit. Click Set Limit to save your settings.
- You’re ready to run an ad!
Your First Facebook Ads Campaign
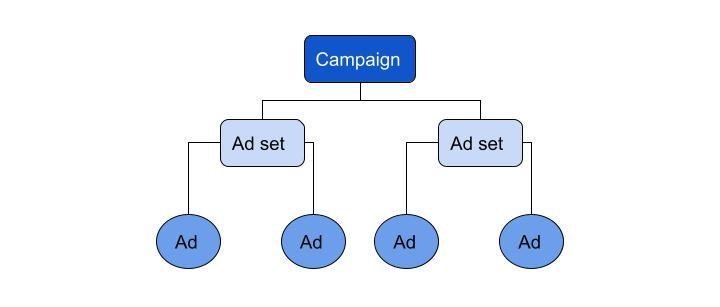
The ads you create in Meta Ads Manager have three parts: campaigns, ad sets, and ads. This is your campaign structure.

Campaign
Your campaign is where you’ll set your objective or goal for your advertising. That objective will be awareness, consideration, or conversion—depending on what you want people to do when they see your ad. The Ads Manager will lead you through these processes step-by-step.
Ad Sets
The next step is designing your ad sets. You’ll determine your targeting strategy, decide whether you want to do A/B testing, choose your placements, set your budget, and choose your scheduling at this level.
Create Your Ad
In this step, you’ll make your custom creative elements. You can have multiple ads or just a single ad in your set. Your advertisement can include text, photos, video, and a call-to-action button.
And You’re on Your Way!
Be sure to watch for the next installment in our blog series, in which we’ll get into the types of Facebook ads you can run in your campaigns! As always, contact us with any questions. We’d love to help you with your digital marketing needs!
Related Posts

Forming Habits
Most people don't properly use social media for their business because they feel too overwhelmed to make it a part of their routine.

Planning Ahead
I'm getting ready to head to a seminar in Vegas this week, and I've been working to make sure I can stay on track for my social media and for the social media accounts that I manage as well.

Expanding Your Organic Reach on Facebook
I've been writing a lot of posts about how to use Facebook for your business lately. I touched on ways to get the Facebook results you want, how to use Facebook ads to your advantage, and even how to review Facebook insights to perfectly target posts to your audience. I wanted to take some time to get into specifics for improving your organic reach on Facebook.


